还记得在 Windows 下用 MFC 或 WTL 写用户界面程序的时候,为了给可改变大小的对话框加上背景图案,需要对设计师提供的图片进行裁剪。把图片切成九块,其中四个角是不拉伸的,四条棱边可以在一个方向上拉伸,中间区域则可任意拉伸。其过程是相当烦琐的。在 Mac 下,一切都变的及其简单,UIImage 类已经为我们提供了处理拉伸的方法。
以下内容适用于 iOS 2.0+,或在 iOS 5.0 + 中使用替换的方法。
UIImage 有一个叫做端帽(end cap)的概念,利用它来指定图片中哪一部分(通常在图片的中央)是可以拉伸的,哪些部分(四周一圈)不可拉伸。在 iOS 5.0 以前,通过 stretchableImageWithLeftCapWidth:topCapHeight: 来得到可以按照指定方式拉伸的图片。特别要注意的一点,我在第一次用它的时候没有注意到,就是这个方法并不会改变当前的 UIImage 实例,而是会返回一个新的实例。这样的设计可能是为了让通过 imageNamed 方法得到的 UIImage 实例能够最大限度地复用吧。
stretchableImage 方法有两个整数参数,分别用来指定图片的左边和上边分别有多少点(points)是不能被拉伸的(端帽宽度)。并没有参数用来指定右边和下边的端帽宽度,开始我误以为右边和下边的端帽宽度就分别等于左边和上边的端帽宽度,然而仔细阅读官方文档之后发现并非如此:
The middle (stretchable) portion is assumed to be 1 pixel wide. The right end cap is therefore computed by adding the size of the left end cap and the middle portion together and then subtracting that value from the width of the image:
rightCapWidth = image.size.width - (image.leftCapWidth + 1);The middle (stretchable) portion is assumed to be 1 pixel wide. The bottom end cap is therefore computed by adding the size of the top end cap and the middle portion together and then subtracting that value from the height of the image:
bottomCapHeight = image.size.height - (image.topCapHeight + 1);
原来已经规定了中间可拉伸区域必须是 1x1 的,因此右边和下边的端帽宽度就由图片的宽度和高度、左边和上边的端帽宽度决定。在设计非对称图案时需要注意一下。
从 iOS 5.0 开始,stretchableImage 方法被弃用,取而代之的是 resizableImageWithCapInsets:。后者只需要一个 UIEdgeInsets 类型的参数,通过此参数,可以设置四个端帽的宽度。而中心剩余的部分都是可以拉伸的(不再局限于 1x1 大小)。
下面这个程序片段给试图添加了三个 UIImageView,分别显示原始大小的图片、无端帽拉伸之后的图片、和指定了正确的端帽宽度(用 stretchableImage)后拉伸的图片。
1 2 3 4 5 6 7 8 9 10 11 12 13 14 15 16 17 18 19 20 21 22 23 24 25 26 27 | - (void)viewDidLoad
{
[super viewDidLoad];
// Do any additional setup after loading the view, typically from a nib.
UIImage* image = [UIImage imageNamed:@"circle.png"];
UIImage* stretchableImage = [image stretchableImageWithLeftCapWidth:10
topCapHeight:10];
UIImageView* imageView1 = [[[UIImageView alloc] initWithImage:image]
autorelease];
imageView1.center = CGPointMake(20, 20);
[self.view addSubview:imageView1];
UIImageView* imageView2 = [[[UIImageView alloc] initWithImage:image]
autorelease];
imageView2.frame = CGRectMake(0, 0, 260, 200);
imageView2.center = CGPointMake(160, 120);
[self.view addSubview:imageView2];
UIImageView* imageView3 = [[[UIImageView alloc]
initWithImage:stretchableImage]
autorelease];
imageView3.frame = CGRectMake(0, 0, 260, 200);
imageView3.center = CGPointMake(160, 340);
[self.view addSubview:imageView3];
}
|
运行后效果如下图示:
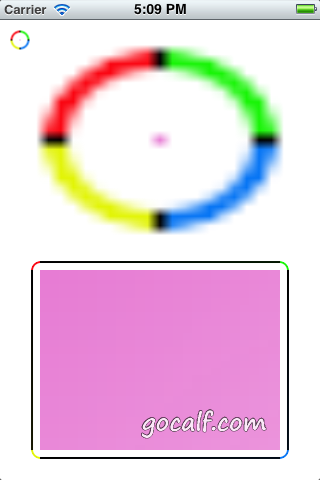
UIImage 拉伸示意(左上角:原始图片;上:直接拉伸;下:按照端帽拉伸)
Comments
So what do you think? Did I miss something? Is any part unclear? Leave your comments below.